My Most Embarrassing Coding Bloopers

Last week I reached a pretty big personal milestone by completing (at least the first version of) my personal website, tatyana.me, which I hope will help me continue my tech startup career. I wanted to celebrate this milestone by taking a moment to reflect on how far I’ve come since I first started learning to code earlier this year. I hope that I’m not alone in having made unforgivably stupid coding mistakes when first starting out. Mistakes like the ones I’m about to share are less common in my coding nowadays, though when they do show up they are either hilarious or they make me want to hurl my face into a wall. Without further ado, please enjoy a short list of my coding bloopers.

Missing without a Trace

I’ve lost my text box. Where did it go? It was just here!

Answer: White text on a white background.

Linked Libraries

Why is my JavaScript not working!?

Answer: “$(document).ready(function() {…});” isn’t just JavaScript, it’s jQuery, too! I hadn’t linked my code to the jQuery library, essentially telling my program to run an undefined function.

Color Confusion

My background color isn’t showing up…

Answer: The color I defined, “rgb(51, 51, 51, .65),” was nonsense. Colors with transparency have “rgba()” values.

Hello, Keybaord

Why is my JavaScript STILL not working!?!??

Answer: I defined “var items = […];” and later called “itms” into action. No, Tatyana, they’re not the same.

Missing without a Trace – Part 2

My navbar deserted me. It’s gone. GONE!

Answer: More like, it was staring at my face. I was searching for my navbar at the top of my page and forgot that I had changed its position from “fixed:top” to “fixed:bottom.”

Total and Complete Failure

Nothing I’m doing is working. Absolutely NOTHING. My page is 100% the same as it was before I changed anything. What’s going on!!!!!?

Answer: Wrong browser. My old site was open in Chrome and my new site was open in Firefox. I was manically refreshing Chrome when I should have refreshed Firefox just once.


These bloopers might be obvious and quick fixes now that I’m standing on my own two feet as a developer but they used to take me a looooong time to figure out. Though, times like these…

(via GIPHY)

…are always worth it for times like these:

(via GIPHY)


Do you have any particularly painful coding bloopers? Share your bloopers in the comments below!

AWS DynamoDB and Ruby on Rails

Overview

Amazon Web Services. Where to begin? AWS is one of the most popular cloud services available today, and for good reason – it works, and it’s affordable. However, for an amateur web developer, using AWS can sometimes be a daunting task. AWS documentation (while very extensive) is pretty dense, and sometimes a version or two behind their actual products. I’d like to help! This post is about how to use AWS DynamoDB with a Ruby on Rails web application.

Last month I released a series of posts where I walked through how to build a database-backed contact form in a Ruby on Rails web application. The form that I built stored messages in a database on a local machine. This setup works well for development but most likely you’ll want your form to be part of a web application that permanently runs on cloud servers. And, you probably want your database to be on a cloud server as well. Luckily, DynamoDB from Amazon Web Services can help you out.

Walkthrough

Step 1: Install the AWS Software Development Kit

AWS has a unique Command Line tool to download for whichever platform you might be working in. For Ruby, download the Ruby software development kit available from AWS here.

Step 2: Include the aws-sdk Gem in your Gemfile

After you’ve finished installing this tool, open the Gemfile (MyAppName/Gemfile) and include the AWS software development kit gem.

gem 'aws-sdk', '~> 2'

Then, install the Gemfile from your computer terminal (make sure you navigate to your app directory first).

$bundle install

After you’ve installed your Gemfile run $gem list in the command line to verify that aws-sdk, aws-sdk-core and aws-sdk-resources are properly installed. Also, if for any reason you happen to have more than one version of aws-sdk installed then delete all old versions before you continue. Speaking from experience, having more than one version of this gem installed can lead to very strange bugs that are better avoided.

Step 3: Login to AWS and Create a DynamoDB Table

For this step AWS actually has some pretty good documentation available here.

Step 4: Configure your DynamoDB Region in an Initializer File

Open a blank text file, title it aws.rb and save it the MyAppName/config/initializers folder. Populate this blank text file with the following code:

require 'aws-sdk'

Aws.config.update ({
region: 'us-west-2',
})

Note: The region specified in the initializer file should be the same region you specified when creating your DynamoDB table.

Step 5: Configure DynamoDB in the Model Controller
The code in this step is taken directly from the messages controller in the post series I mentioned earlier where I walked through how to build a database-backed contact form in Ruby on Rails. As a bit of review, in my example a Message model creates a messages table in a database populated with individual message entries, and the Ruby code to control how entries are saved to the database lives in the Messages controller.

To tell your Messages controller to save new message entries to your newly-created DynamoDB table, simply open the messages_controller.rb file saved in MyAppName/app/controllers and add the following highlighted code:

class MessagesController < ApplicationController
def create
@message = Message.new(message_params)
respond_to do |format|
#CREATE NULL ERROR ARRAYS
@errorName = []
@errorContent = []
if @message.save
#DYNAMODB CODE BLOCK
dynamodb = Aws::DynamoDB::Client.new
dynamodb.put_item(:table_name => "Name_of_DynamoDB_Table", :item =>
{
"email" => @message.email,
"content" => @message.content,
"created_at" => @message.created_at.to_s
})
format.js {flash[:notice] = "Thanks! We've received your message."}
@resetForm = "1"
else
format.js
@message.errors.any?
#PUSH ERROR MESSAGES INTO ERROR ARRAYS
if (@message.errors["email"] != nil)
@errorName.push(@message.errors["name"][0])
end
if (@message.errors["content"] != nil)
@errorContent.push(@message.errors["content"][0])
end
@resetForm = "0"
end
end
end
 
private
def message_params
params.require(:message).permit(:email, :content)
end
end

Note: The columns I am populating in my DynamoDB table (email, content, and timestamp) are the same as the columns I created in the Message model database migration file saved in MyAppName/db/migrate/[timedate]_create_messages.rb.

That’s all, folks. I hope this walkthrough helps to demystify how to incorporate DynamoDB into your Ruby on Rails apps.


Did you find this walkthrough helpful?

Do you have questions on the above?

Do you see any errors?


If so, please leave your thoughts in the comments below.

Build a Rails Form (and Skip the Gems!) – Part IV: Form Reset & Success Message

Part IV: Form Reset & Success Message

Overview
Before reading this section, I encourage you to read through the previous posts in this series in case you haven’t already.

At the end of Part III I mentioned that that only two things remain to implement into the contact form: the ability to reset and the ability to display a success message to the end user. I will incorporate this functionality in this final post of this walkthrough series.

Walkthrough

Step 1: Add A Flash Notice to the Message Controller
Open the messages_controller.rb file saved in MyAppName/app/controllers and add a flash[:notice] that contains a success message.

class MessagesController < ApplicationController
def create
@message = Message.new(message_params)
respond_to do |format|
#CREATE NULL ERROR ARRAYS
@errorName = []
@errorContent = []
if @message.save
format.js {flash[:notice] = "Thanks! We've received your message."}
else
format.js
@message.errors.any?
#PUSH ERROR MESSAGES INTO ERROR ARRAYS
if (@message.errors["email"] != nil)
@errorName.push(@message.errors["name"][0])
end
if (@message.errors["content"] != nil)
@errorContent.push(@message.errors["content"][0])
end
end
end
end
 
private
def message_params
params.require(:message).permit(:email, :content)
end
end

Step 2: Add a Success Span to the Form Partial View
Open _form.html.erb saved in MyAppName/app/views/messages and add a span with the Bootstrap .help-block class. This span will contain the success message if and when it is not null.

<%= form_for @message, :html => {:class => "form-horizontal"}, remote: true do |f| %>
<div class="form-group">
<%= f.label :email, "Email address:", class: "col-sm-2 control-label" %>
<div class="col-sm-10">
<%= f.email_field :email, class: "form-control", :placeholder => "Email"%>
<span id="emailBlock" class="help-block"></span>
</div>
</div>
<div class="form-group">
<%= f.label :content, "Message:", class: "col-sm-2 control-label" %>
<div class="col-sm-10">
<%= f.text_area :content, class: "form-control", rows: 5 :placeholder => "Your message"%>
<span id="contentBlock" class="help-block"></span>
</div>
</div>
<%= f.submit "Submit", class: "btn btn-primary", data: {disable_with: "Loading..."} %>
<span id="helpBlock" class="help-block"></span>
<% end %>

Step 3: The JavaScript Partial View
Open the create.js.erb partial view file saved in MyAppName/app/views/messages and add code that inserts success messages into the span added in the previous step.

//REMOVE ANY PREVIOUS NOTICES
$(".notice").remove();
$(".form-group").removeClass("has-error");
 
//DISPLAY ERROR MESSAGES
$("#emailBlock").append('<div class="notice"><%=escape_javascript(@errorEmail[0])%></div>');
$("emailBlock:contains(.)").closest(".form-group").addClass("has-error");
 
$("#contentBlock").append('<div class="notice"><%=escape_javascript(@errorContent[0])%></div>');
$("contentBlock:contains(.)").closest(".form-group").addClass("has-error");
 
//DISPLAY SUCCESS MESSAGE
$("#helpBlock").append('<div class="notice"><%=escape_javascript(flash.discard(:notice))%></div>');

Step 4: Reset the Form – Messages Controller
Open the messages_controller.rb file saved in MyAppName/app/controllers and define a variable that is equal to either 1 or 0 depending on whether the new @message instance was successfully saved.

class MessagesController < ApplicationController
def create
@message = Message.new(message_params)
respond_to do |format|
#CREATE NULL ERROR ARRAYS
@errorName = []
@errorContent = []
if @message.save
format.js {flash[:notice] = "Thanks! We've received your message."}
@resetForm = "1"
else
format.js
@message.errors.any?
#PUSH ERROR MESSAGES INTO ERROR ARRAYS
if (@message.errors["email"] != nil)
@errorName.push(@message.errors["name"][0])
end
if (@message.errors["content"] != nil)
@errorContent.push(@message.errors["content"][0])
end
@resetForm = "0"
end
end
end
 
private
def message_params
params.require(:message).permit(:email, :content)
end
end

Step 5: Reset the form: JavaScript Partial View
Open the create.js.erb partial view file saved in MyAppName/app/views/messages and add the code that resets the form based on the value of the @resetForm variable.

//REMOVE ANY PREVIOUS NOTICES
$(".notice").remove();
$(".form-group").removeClass("has-error");
 
//DISPLAY ERROR MESSAGES
$("#emailBlock").append('<div class="notice"><%=escape_javascript(@errorEmail[0])%></div>');
$("emailBlock:contains(.)").closest(".form-group").addClass("has-error");
 
$("#contentBlock").append('<div class="notice"><%=escape_javascript(@errorContent[0])%></div>');
$("contentBlock:contains(.)").closest(".form-group").addClass("has-error");
 
//DISPLAY SUCCESS MESSAGE
$("#helpBlock").append('<div class="notice"><%=escape_javascript(flash.discard(:notice))%></div>');
 
//RESET FORM IF MESSAGE SAVED
<% if @resetForm == "1" %>
$(".form-horizontal")[0].reset();
<% end %>

To protect user experience, it is important to that the form does not reset following an unsuccessful submission. Isn’t it frustrating when your whole message gets deleted just because you forgot to enter your email address? That doesn’t happen in this form!

Wrap-Up
Now that you’ve reached the end of the walkthrough, go ahead and run $rails server in your computer terminal. The form should have all of the wonderful capabilities mentioned in the walkthrough Overview. The walkthrough Overview also contains all of the final code in on place for your reference. I hope you enjoy your new database-backed Ruby on Rails contact form!

What’s Next?
Now that you know how to build a contact form that stores messages in a database on a local machine, learn about how to configure this form to store messages on the Amazon Web Services global cloud in a DynamoDB database by reading my next post.


Did you find this walkthrough helpful?

Do you have questions on the above?

Do you see any errors?


If so, please leave your thoughts in the comments below.

Build a Rails Form (and Skip the Gems!) – Part III: Input Validation & Help Text

Part III: Input Validation & Help Text

Overview
Before reading this section, I encourage you to read through the previous posts in this series in case you haven’t already.

At the end of Part II I mentioned that turning on Ajax causes the Messages controller to search for a JavaScript partial view as part of the Ruby on Rails create action. I will populate this view in this post.

However, the form currently accepts any and all submissions (including blank submissions). That’s bad. In this section I will also incorporate validators into the contact form, and I will do this before creating the JavaScript partial view. You’ll see why this order makes sense very soon.

Walkthrough

Step 1: Add Validators and Error Messages to the Message Model
Open the message.rb file saved in MyAppName/app/models and add validators such that:

  1. The database does not accept blank entries
  2. The database does not accept non-email inputs in the email field

class Message < ActiveRecord::Base
validates :email, :presence => {message: "Email address cannot be blank."}, email_format: {message: "Please enter a valid email address."}, :on => :create
validates :content, :presence => {message: "Message content cannot be blank."}, :length => { :minimum => 2, message: "Message is too short." }, :on => :create
end

Mini-Step 1: Install the validates_email_format_of gem
The validates_email_format_of gem allows the email_format validator to work. Though I usually don’t like to use gems, this one is fairly harmless. Install this gem by adding gem 'validates_email_format_of' to the gemfile and running $bundle install from the computer terminal.

Note: It isn’t really necessary to include the email_format validator when you specify in the _form.html.erb view that the email input goes into an email_field, as I did in Part II, Step 1. However, I like to use the email_format validator just in case older browsers do not trigger automatic input validation upon encountering non-email inputs in an email_field.

Step 2: Define Error Message Arrays
Open the messages_controller.rb file saved in MyAppName/app/controllers and define two empty arrays to store error messages. Then, push objects from the default @message.errors hash into one of these two new arrays based on whether the object has either the :email or the :content key.

class MessagesController < ApplicationController
def create
@message = Message.new(message_params)
respond_to do |format|
#CREATE NULL ERROR ARRAYS
@errorName = []
@errorContent = []
if @message.save
format.js
else
format.js
@message.errors.any?
#PUSH ERROR MESSAGES INTO ERROR ARRAYS
if (@message.errors["email"] != nil)
@errorName.push(@message.errors["name"][0])
end
if (@message.errors["content"] != nil)
@errorContent.push(@message.errors["content"][0])
end
end
end
end
 
private
def message_params
params.require(:message).permit(:email, :content)
end
end

Note: There are many different methods for displaying error messages when a user submits inputs that trigger validation errors. I will discuss only one method in this walkthrough. To learn more I encourage you to read about how to Display Error Messages on an Ajax Rails Form: Three Methods.

Step 3: Add Error Spans to the Form Partial View
Open _form.html.erb saved in MyAppName/app/views/messages and add the following spans with the Bootstrap .help-block class:

<%= form_for @message, :html => {:class => "form-horizontal"}, remote: true do |f| %>
<div class="form-group">
<%= f.label :email, "Email address:", class: "col-sm-2 control-label" %>
<div class="col-sm-10">
<%= f.email_field :email, class: "form-control", :placeholder => "Email"%>
<span id="emailBlock" class="help-block"></span>
</div>
</div>
<div class="form-group">
<%= f.label :content, "Message:", class: "col-sm-2 control-label" %>
<div class="col-sm-10">
<%= f.text_area :content, class: "form-control", rows: 5 :placeholder => "Your message"%>
<span id="contentBlock" class="help-block"></span>
</div>
</div>
<%= f.submit "Submit", class: "btn btn-primary", data: {disable_with: "Loading..."} %>
<% end %>

Step 4: The JavaScript Partial View
It’s finally time to create the JavaScript partial view! JavaScript partial views interact with html views (like _form.html.erb). This matters because it means that JavaScript partial views respond to user actions (like form submissions) by changing the objects inside an html view (e.g. by adding content to the error spans added in the previous step) WITHOUT requiring the affected html view to reload. Cool, right?

Open a blank text file and save it as create.js.erb in MyAppName/app/views/messages. Populate this view with the following code:

//REMOVE ANY PREVIOUS NOTICES
$(".notice").remove();
 
//DISPLAY ERROR MESSAGES
$("#emailBlock").append('<div class="notice"><%=escape_javascript(@errorEmail[0])%></div>');
 
$("#contentBlock").append('<div class="notice"><%=escape_javascript(@errorContent[0])%></div>');

Notice the use of escape_javascript? Every time we embed Ruby code into a JavaScript block, we must first escape JavaScript so that Rails will recognize the subsequent code as Ruby and not as JavaScript.

Step 5: Incorporate the Bootstrap .has-error Class
This step is optional, but I really like it. The Bootstrap .has-error class draws attention to incorrect form fields by marking them in red. In the same create.js.erb partial view file, insert the following code to add the .has-error class to .form-groups when form inputs violate the validations:

//REMOVE ANY PREVIOUS NOTICES
$(".notice").remove();
$(".form-group").removeClass("has-error");
 
//DISPLAY ERROR MESSAGES
$("#emailBlock").append('<div class="notice"><%=escape_javascript(@errorEmail[0])%></div>');
$("emailBlock:contains(.)").closest(".form-group").addClass("has-error");
 
$("#contentBlock").append('<div class="notice"><%=escape_javascript(@errorContent[0])%></div>');
$("contentBlock:contains(.)").closest(".form-group").addClass("has-error");

Wrap-Up
At this point in the walkthrough you should have a highly functioning contact form. Go ahead and run $rails server in your computer terminal to see the results so far. Do you notice how the view doesn’t undergo a full-page reload when you press “Submit”? That’s Ajax at work!

Test out the form’s validations by attempting to submit bad inputs. You should see error messages appear upon submitting bad inputs into the form:

red errors

Want proof that bad inputs haven’t made their way into your Rails database? Shut down your rails server and take a look at the Rails database. Not sure how to view the contents of a Rails database? Take a quick read through How to View the Contents of a Rails Database using only the CLI.

There are just two things missing on the form:

  • The ability to reset after submission
  • The ability to display a success message when messages are saved to the database

I will incorporate these two steps in the next, and final, post in this series.

Continue to Part IV: Form Reset & Success Message


Did you find this walkthrough helpful?

Do you have questions on the above?

Do you see any errors?


If so, please leave your thoughts in the comments below.

Build a Rails Form (and Skip the Gems!) – Part II: All About the Form

Part II: All About the Form

Overview
Before reading this section, I encourage you to read through the previous posts in this series in case you haven’t already.

At the end of Part I I mentioned that in this post I would begin populating the contact form view. In the walkthrough Overview I wrote that the contact form would live inside a partial view contained within the application’s root page (think of a contact form at the bottom of a home page).

Partial views function very well with the built-in Ajax capabilities of Ruby on Rails. Both partial views and Ajax are relevant to this post, and I will do my best to explain how as I walk through the next steps for building a contact form in a Rails application.

Walkthrough

Step 1: Create and Populate the Messages Partial View
Partial views are a lot like regular views in Rails, except they can be contained within other views and manipulated without requiring their containing views to be reloaded. This makes your app faster!

Partial views are differentiated from regular views by the underscore (_) in the beginning of their file names. Open a blank text file, name it _form.html.erb, and save it in MyAppName/app/views/messages.

Then, use the Rails form_for helper to build the contact form infrastructure:

<%= form_for @message, :html => {:class => "form-horizontal"}, remote: true do |f| %>
<div class="form-group">
<%= f.label :email, "Email address:", class: "col-sm-2 control-label" %>
<div class="col-sm-10">
<%= f.email_field :email, class: "form-control", :placeholder => "Email"%>
</div>
</div>
<div class="form-group">
<%= f.label :content, "Message:", class: "col-sm-2 control-label" %>
<div class="col-sm-10">
<%= f.text_area :content, class: "form-control", rows: 5 :placeholder => "Your message"%>
</div>
</div>
<%= f.submit "Submit", class: "btn btn-primary", data: {disable_with: "Loading..."} %>
<% end %>

Note: The Rails form_for helper generates HTML <form></form> tags and also tells browsers which model the form is about (in our case, the Message model). You can learn more about form helpers here.

Note: f.text_field generates a field that would accommodate a single line of text, while f.text_area generates a flexible field that can accommodate multiple lines of text (in this case I specified 5).

Note: data: {disable_with: “Loading…”} disables the Submit button while Rails is communicating with the database and changes the button’s text from “Submit” to “Loading…”. This protects against duplicate submissions.

Note: remote: true turns on Rails’ built-in Ajax capabilities. To learn about the implications of adding remote: true to a form, I encourage you to read A Discussion on Ajax.

An Aside on Bootstrap
The code for the contact form relies heavily on Bootstrap (one of my favorite front-end development tools!). In addition to Bootstrap’s standard grid-based column classes, I also used the following Bootstrap classes in the above code:

  • .form-horizontal for the main form format
  • .form-control for 100% width of textual elements
  • .form-group for optimum spacing of labels and form controls
  • .control-label so that fields can receive validation styles (explained in Part III)
  • .btn .btn-primary for button styling

To make sure that Bootstrap is working properly in your web application, I encourage you to read this post. Also, I’d like to give a shoutout to Rahul Singh for helping me understand how to incorporate Bootstrap into my form. Thanks!

Step 2: Routes
By default, html forms submit HTTP POST requests to a database. Rendering a form that creates a new resource (i.e. a new message) is made possible by an HTTP GET request. HTTP GET and HTTP POST requests are mapped to the Rails new and create actions, respectively. This means that the application router needs a new and a create route for the Message model.

Open the routes.rb file saved in MyAppName/config and insert the following routes:

Rails.application.routes.draw do
root 'pages#index'
get 'messages/new' => 'messages#new'
post 'messages' => 'messages#create'
end

Note: To learn more about how HTTP verbs are mapped to controller actions, click here.

Step 3: Render the Messages Partial View from the Root View
Open the index.html.erb file saved in MyAppName/app/views/pages and render the newly created _form.html.erb partial view.

<div>
<p>Interested in learning more? Send us a message!</p>
<%= render 'messages/form' %>
</div>

Step 4: Define the ‘new’ Action in the Pages Controller
Ruby on Rails tutorials would typically place the new action for the Message model inside the Messages controller, and it would look something like this:

#EXAMPLE ONLY, DON'T USE THIS
class MessagesController < ApplicationController
def new
@message = Message.new
end
end

However, in this walkthrough the new action is called when the _form.html.erb partial view is rendered by the root view. This means that the new action for the Message model must be defined in the Pages controller.

Open the pages_controller.rb file saved in MyAppName/app/controllers and define the new action.

class PagesController < ApplicationController
def index
@message = Message.new
end
end

Step 5: Define the ‘create’ Action in the Messages Controller (Modified for AJAX)
In Step 1 above, I briefly mentioned that including remote: true in the Rails form_for helper turns on the built-in Ajax capabilities of Ruby on Rails. If you understand Ajax, or if you read A Discussion on Ajax, then you will know that Ajax tells the Rails create action to render a JavaScript partial view instead of a default html view. Thus, we need to add a respond_to do |format| block into the Messages controller’s create action that will direct Rails to a JavaScript partial view.

Open the messages_controller.rb file saved in MyAppName/app/controllers and define the create action, along with a message_params method.

class MessagesController < ApplicationController
def create
@message = Message.new(message_params)
respond_to do |format|
if @message.save
format.js
else
format.js
end
end
end
 
private
def message_params
params.require(:message).permit(:email, :content)
end
end

The message_params method is used to safely collect data and update the Rails database. This method requires the model name (Message) and permits the columns that were added to the messages table from the migration file (Part I: Step 7).

Wrap-Up

At this point in the walkthrough the Messages controller renders a JavaScript partial view when the form is submitted. This view doesn’t exist yet but I’ll create it in the next post.

Continue to Part III: Input Validation and Help Text


Did you find this walkthrough helpful?

Do you have questions on the above?

Do you see any errors?


If so, please leave your thoughts in the comments below.

Build a Rails Form (and Skip the Gems!) –Part I: Application Infrastructure

Overview

Before reading this post I encourage you to check out the walkthrough Overview, if you haven’t already, for a discussion on all of the capabilities I will build into a Ruby on Rails contact form.

Also, I will use Bootstrap and jQuery to build the form. If you’re not sure whether you have these tools working properly in your Rails application, then read this post.

Walkthrough

Step 1: Build the App and Install Gems
Create the application from the computer terminal and install the gemfile.

$rails new MyAppName
$bundle install

Step 2: Create Two Controllers
Create the Pages controller and the Messages controller by running the following two commands in the computer terminal:

$rails generate controller Messages
$rails generate controller Pages

Note: Controller names should be plural and capitalized.

Step 3: Define the Pages Controller’s Index Action
Open the newly-generated pages_controller.rb file saved in MyAppName/app/controllers and define the index action.

class PagesController < ApplicationController
def index
end
end

Step 4: Root the Application
Open the routes.rb file saved in MyAppName/config and root the web application to the Pages controller’s index action.

Rails.application.routes.draw do
root 'pages#index'
end

Step 5: Create the Pages Controller’s Index View
Open a blank text document and save it as index.html.erb in MyAppName/app/views/pages. Insert any code you would like for your application’s home page. For simplicity, I will use the following:

<div>
<p>Interested in learning more? Send us a message!</p>
</div>

Step 6: Create the Model
Create a model from the computer terminal. Note: Message is the model name, and it is the singular of the controller name, Messages.

$rails generate model Message

A model generates a table in a Rails database whose name is the plural and lower-case version of the model name. In this case, the Message model creates a messages table in the Rails database.

Step 7: Customize the Migration File
Open the messages table file that was automatically generating when creating the Message model. This file is saved in MyAppName/db/migrate and the file name has the format [timedate]_create_messages.rb. For the messages table to have columns for :email, :content, and timestamps, make the following changes to the change method:

class CreateMessages < ActiveRecord::Migration
def change
create_table :messages do |t|
t.text :email
t.text :content
t.timestamps
end
end
end

Migration files update the database. For example, the first t.text line creates a text column called :email in the messages table. You can also learn more by reading about Active Record Migrations.

Step 8: Run a Migration and Seed the Database
Run the following two commands in the computer terminal:

$rake db:migrate
$rake db:seed

db:migrate updates the database with the new Message model. db:seed populates the messages table with sample data.

Wrap-Up
At this point in the walkthrough I’ve set up the preliminary Model-View-Controller infrastructure that is more or less the same for any Rails application. Aside from creating the Message model and modifying its migration file, none of the steps in this section were particularly influenced by the fact that I am building a contact form. That’s about to change in the next section where I will begin populating the contact form view.

Continue to Part II: All About the Form


Did you find this walkthrough helpful?

Do you have questions on the above?

Do you see any errors?


If so, please leave your thoughts in the comments below.

Build a Rails Form (and Skip the Gems!) – An Overview

An Overview

The Goal: A Contact Form
One of the first times I needed to implement database-backed functionality as an amateur web developer was when I built a contact form for a Ruby on Rails web application. The form I wanted to build looked something like this:

form example2

Looks familiar, right? When building this form I felt frustrated that all the information I needed to know was either scattered around the web, or relied heavily on outside gems (I personally prefer to use as few gems as possible). So, why not write my own walkthrough?

In this series of posts I will document everything I did to build a fully functioning contact form in Ruby on Rails, starting from $rails new MyAppName.

The Capabilities
The contact form will have the following capabilities:

Input Validation

  • Reject blank submissions (email & content fields)
  • Require email submissions to be properly formatted
  • Require a minimum message length

Database Storage

  • Store messages on a database

Help Text

  • Display error messages if the form receives bad inputs
  • Display a success message upon a successful form submission

Form Reset

  • Reset the form after a successful message submission
  • Do not reset the form if a validation error is triggered

Ajax

  • Send messages to the database asynchronously so that:
    • Help text is displayed without a full-page reload
    • The form is reset without a full-page reload

The Location
The contact form will live in a partial view that is contained within the root page of a web application (think of a contact form at the bottom of a home page).

The Tools
I configured my Rails app to support the following two tools:

To learn how to do this, check out my post on how to Convert a Static HTML Website to a Ruby on Rails Web Application.

The Finished Product
I’ve included all of the final code for the contact form below. The color reflects which post in this series discusses the relevant code, per the following color key: Part I | Part II | Part III | Part IV.

Router

MyAppName/config/routes.rb

Rails.application.routes.draw do
root 'pages#index'
get 'messages/new' => 'messages#new'
post 'messages' => 'messages#create'
end

Controllers

MyAppName/app/controllers/pages_controller.rb

class PagesController < ApplicationController
def index
@message = Message.new
end
end

MyAppName/app/controllers/messages_controller.rb

class MessagesController < ApplicationController
def create
@message = Message.new(message_params)
respond_to do |format|
#CREATE NULL ERROR ARRAYS
@errorName = []
@errorContent = []
if @message.save
format.js {flash[:notice] = "Thanks! We've received your message."}
@resetForm = "1"
else
format.js
@message.errors.any?
#PUSH ERROR MESSAGES INTO ERROR ARRAYS
if (@message.errors["email"] != nil)
@errorName.push(@message.errors["name"][0])
end
if (@message.errors["content"] != nil)
@errorContent.push(@message.errors["content"][0])
end
@resetForm = "0"
end
end
end
 
private
def message_params
params.require(:message).permit(:email, :content)
end
end

Views

MyAppName/app/views/pages/index.html.erb

<div>
<p>Interested in learning more? Send us a message!</p>
<%= render 'messages/form' %>
</div>

MyAppName/app/views/messages/_form.html.erb

<%= form_for @message, :html => {:class => "form-horizontal"}, remote: true do |f| %>
<div class="form-group">
<%= f.label :email, "Email address:", class: "col-sm-2 control-label" %>
<div class="col-sm-10">
<%= f.email_field :email, class: "form-control", :placeholder => "Email"%>
<span id="emailBlock" class="help-block"></span>
</div>
</div>
<div class="form-group">
<%= f.label :content, "Message:", class: "col-sm-2 control-label" %>
<div class="col-sm-10">
<%= f.text_area :content, class: "form-control", rows: 5 :placeholder => "Your message"%>
<span id="contentBlock" class="help-block"></span>
</div>
</div>
<%= f.submit "Submit", class: "btn btn-primary", data: {disable_with: "Loading..."} %>
<span id="helpBlock" class="help-block"></span>
<% end %>

MyAppName/app/views/messages/create.js.erb

//REMOVE ANY PREVIOUS NOTICES
$(".notice").remove();
$(".form-group").removeClass("has-error");
 
//DISPLAY ERROR MESSAGES
$("#emailBlock").append('<div class="notice"><%=escape_javascript(@errorEmail[0])%></div>');
$("emailBlock:contains(.)").closest(".form-group").addClass("has-error");
 
$("#contentBlock").append('<div class="notice"><%=escape_javascript(@errorContent[0])%></div>');
$("contentBlock:contains(.)").closest(".form-group").addClass("has-error");
 
//DISPLAY SUCCESS MESSAGE
$("#helpBlock").append('<div class="notice"><%=escape_javascript(flash.discard(:notice))%></div>');
 
//RESET FORM IF MESSAGE SAVED
<% if @resetForm == "1" %>
$(".form-horizontal")[0].reset();
<% end %>

Model

MyAppName/app/models/message.rb

class Message < ActiveRecord::Base
validates :email, :presence => {message: "Email address cannot be blank."}, email_format: {message: "Please enter a valid email address."}, :on => :create
validates :content, :presence => {message: "Message content cannot be blank."}, :length => { :minimum => 2, message: "Message is too short." }, :on => :create
end

MyAppName/db/migrate/[timedate]_create_messages.rb

class CreateMessages < ActiveRecord::Migration
def change
create_table :messages do |t|
t.text :email
t.text :content
t.timestamps
end
end
end

The Walkthrough
Now that you know what I’ll be building and what it’ll look like, go ahead and take a read through my four-part walkthrough where I explain all the details behind the above code.

What’s Next?
This walkthrough shows how to build a contact form that stores messages in a database on a local machine. To configure this contact form to store messages on the Amazon Web Services global cloud in a DynamoDB database, check out my next post.


Did you find this walkthrough helpful?

Do you have questions on the above?

Do you see any errors?


If so, please leave your thoughts in the comments below.

Display Error Messages on an Ajax Rails Form: Three Methods

Motivation

Recently I released a series of posts that walks through how to build a real-world database-backed contact form in a Ruby on Rails application. While working on that series, I decided to also write this shorter post to expand on a topic I touch on, namely, how to display error messages on an Ajax Rails form.

Note: For a high-level overview of Ajax, check out this post.

What am I talking about? Let’s take the following form built with Rails, Ajax, and Bootstrap as an example:

form example

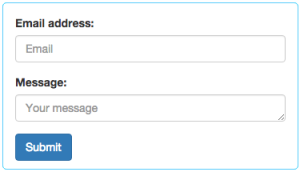
This form uses Ajax to send HTTP POST requests to a model table in a Rails database. In my example, the model is named Messages.

In the Messages model I wrote validations to require a correct email format in the email field, as well as a minimum message length in the message field. The validations look like this:

class Message < ActiveRecord::Base
validates :email, :presence => {message: "Email address cannot be blank."}, email_format: {message: "Please enter a valid email address."}, :on => :create
validates :content, :presence => {message: "Message content cannot be blank."}, :length => { :minimum => 2, message: "Message is too short."}, :on => :create
end

See those {message: “...”} lines? Users need to see those (if and when their form submissions trigger the validation constraints), and in this post I will walk through three ways to display validation error messages to users.

Walkthrough

Method 1: Display All Errors

Step 1: The Form View
Open the form html view (or in my case, the form html partial view). In my example my view file is saved as _form.html.erb in MyAppName/views/messages. Add a <span></span> that has the Bootstrap class .help-block to the bottom of the form, right before the <% end %> tag.

<%= form_for @message, :html => {:class => "form-horizontal"}, remote: true do |f| %>
<div class="form-group">
<%= f.label :email, "Email address:", class: "col-sm-2 control-label" %>
<div class="col-sm-10">
<%= f.email_field :email, class: "form-control", :placeholder => "Email"%>
</div>
</div>
...
<span id="helpBlock" class="help-block"></span>
<% end %>

Step 2: The Controller
Open the model controller. In my example my model controller is saved as messages_controller.rb in MyAppName/app/controllers. Add the following code:

def create
@message=Message.new(message_params)
respond_to do |format|
if @message.save
format.js
else
format.js
@message.errors.any?
@message.errors.each do |key, value|
end
end
end
end

Step 3: The JavaScript Partial View
Open the JavaScript partial view that is rendered by the Rails create action. In my example it is saved as create.js.erb in MyAppName/app/views/messages. Add the following code:

//remove old validation messages
$(".notice").remove();
 
//display new validation messages
<% @message.errors.each do |key, value| %>
$(“#helpBlock”).append(‘<div class=”notice”><%= escape_javascript(value)%></div>’);
<% end %>

OR, if you’d like to display the key-value pairs of the @message.errors hash, then use this code:

//remove old validation messages
$(".notice").remove();
 
//display new validation messages
<% @message.errors.full_messages.each do |message| %>
$(“#helpBlock”).append(‘<div class=”notice”><%= escape_javascript(message)%></div>’);
<% end %>

Note: If you choose this second variation, there is no need to modify the controller code I wrote above because the create.js.erb view will render properly as long as one of the variables @message.errors.each do |key, value| or @message.errors.full_messages.each do |message| is provided to it by the controller.
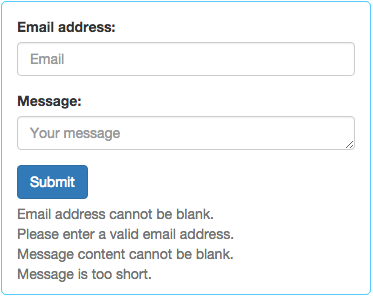
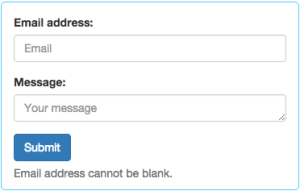
The Result
all_messages

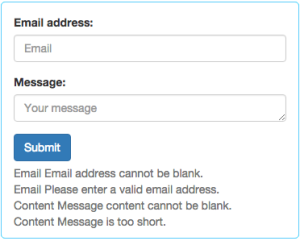
The Result (if you chose the key-value modification)
all_messages_full_hash

Though this first method, both modified and unmodified, accomplishes the goal of displaying validation messages to the end user, I think it bombards the user with too much negative information. The next method is user-friendlier.

Method 2: Display Only The First Error

Step 1: The Form View
…is unchanged from the previous method.

Step 2: The Controller
Initialize an empty @errorMessage array and push in values from the @message.errors hash.

def create
@message=Message.new(message_params)
respond_to do |format|
@errorMessage = []
if @message.save
format.js
else
format.js
@message.errors.any?
@message.errors.each do |key, value|
@errorMessge.push(value)
end
end
end
end

Step 3: The JavaScript Partial View
Display the first element of the @errorMessage array.

//remove old validation messages
$(".notice").remove();
 
//display new validation messages
$(“#helpBlock”).append(‘<div class=”notice”><%= escape_javascript(@errorMessage[0])%></div>’);

The Result
one_message

This method is a big improvement over the previous method, but it’s disadvantage is that the end user isn’t fully aware of all the changes that need to be made in order for the form to pass all validation checks. I prefer the next method because it brings attention to each input field that triggered an error without bombarding the user with too much negative information.

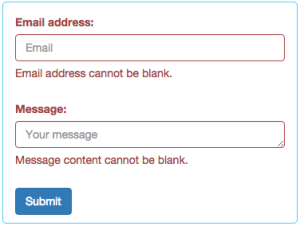
Method 3: Display Errors Near Input Fields and use the Bootstrap .has-error Class
In this method I will use the Bootstrap .has-error class in combination with the Bootstrap .form-group class to bring attention to specific fields that triggered validation messages.

Step 1: The Form View
In the previous two methods I included one span with the Bootstrap .help-block class at bottom of the form. In this method I will instead include two unique .help-block spans beneath each input field.

<%= form_for @message, :html => {:class => "form-horizontal"}, remote: true do |f| %>
<div class="form-group">
<%= f.label :email, "Email address:", class: "col-sm-2 control-label" %>
<div class="col-sm-10">
<%= f.email_field :email, class: "form-control", :placeholder => "Email"%>
<span id = "emailBlock" class="help-block"></span>
</div>
</div>
<div class="form-group">
<%= f.label :content, "Message:", class: "col-sm-2 control-label" %>
<div class="col-sm-10">
<%= f.text_area :content, class: "form-control", rows: 1, :placeholder => "Your message"%>
<span id = "contentBlock" class="help-block"></span>
</div>
</div>
<% end %>

Step 2: The Controller
Initialize an empty error message array for each key within the @message.errors hash. In this example I have two keys: :email and :content. Then, push values from the @message.errors hash into the corresponding array.

def create
@message=Message.new(message_params)
respond_to do |format|
@errorEmail = []
@errorContent = []
if @message.save
format.js
else
format.js
@message.errors.any?
if (@message.errors["email"] != nil)
@errorName.push(@message.errors["name"][0])
end
if (@message.errors["content"] != nil)
@errorContent.push(@message.errors["content"][0])
end
end
end
end

Step 3: The JavaScript Partial View
Display the first element of each array inside the two .help-block spans that were added in Step 1. Then use jQuery to add the Bootstrap .has-error class to the appropriate <div></div>’s that have the Bootstrap .form-group class.

//remove old validation messages
$(".notice").remove();
//remove old instances of the .has-error class
$(".form-group").removeClass("has-error");
 
//display new validation messages and add the Bootstrap .has-error class
$(“#emailBlock”).append(‘<div class=”notice”><%= escape_javascript(@errorEmail[0])%></div>’);
$("#emailBlock:contains(.)").closest(".form-group").addClass("has-error");
$(“#contentBlock”).append(‘<div class=”notice”><%= escape_javascript(@errorContent[0])%></div>’);
$("#contentBlock:contains(.)").closest(".form-group").addClass("has-error");

The Result
red errors

Wrap-Up
There you have it: three methods for displaying validation error messages on a Rails form built with Ajax. These three methods each have their own advantages and disadvantages, and which method (or combination of methods) you choose to use should depend on your development and/or user-experience needs.


Did you find this walkthrough helpful?

Do you have questions on the above?

Do you see any errors?


If so, please leave your thoughts in the comments below.

A Discussion on Ajax

Motivation

Shortly after writing this I uploaded a series of posts in which I walked through how to build a real-world database-backed contact form in a Ruby on Rails web application. The form was contained within a partial view that was rendered from a larger view (think of a contact form at the bottom of a home page).

In addition to many other capabilities, the form can:

  1. Display help text after both successful and unsuccessful submissions, and
  2. Reset all fields upon submission

The catch is that I wanted this to be possible without causing the larger view to reload after each form submission. In order to build this, I needed to use asynchronous JavaScript and XML, otherwise known as Ajax.

It took me an excruciatingly long time to figure out how to build my contact form with Ajax. While searching for a solution I often found instructions to simply add remote: true to my <%=form_for...%>...<%end%> code block within my partial view, and then to wave around some JavaScript magic. I plugged away for days and NOTHING worked. It was a nightmare.

I finally figured out that I first needed to take a step back and understand Rails forms built with Ajax from a high level before trying to incorporate Ajax-related code into my application. Videos by Ryan Bates and Sagar Shah helped me tremendously in understanding the theory behind how Ajax works in a Rails form.

The Theory

By default Rails renders both full and partial views that are written in an html format (think of views named [view].html.erb or _[partialview].html.erb). Rendering an html view requires a full-page reload. However, Rails has built-in Ajax capabilities that allow for the rendering of partial views written in a JavaScript format. JavaScript partial views are named [view].js.erb, and they can interact with html views.

This matters because JavaScript partial views can respond to user actions by changing the objects inside an html view WITHOUT requiring the affected html view to reload.

Let’s look at a filled-out form as an example. Before the user hits “submit”, it will look something like this:

completed form_2

An Aside on Assumptions

Let’s assume that to build the form shown above we first created a model named Message. Let’s also assume that this form is coded inside a partial view (named, for example, _form.html.erb) and saved in MyAppName/app/views/messages. The embedded Ruby code written inside the partial view, which generates the above form, would look something like this:

<%= form_for @message ... do |f| %>
...
<%= f.submit "Submit" %>
<% end %>

Next let’s assume that the controller (named Pages in this example) that provides the main view to the browser (i.e. the “home” page view, named index.html.erb) contains the following code:

class PagesController < ApplicationController
def index
@message = Message.new
end
end

And, let’s assume that the Messages controller responsible for the _form.html.erb partial view (rendered by the Pages controller’s index.html.erb view) contains the following code:

class MessagesController < ApplicationController
def create
@message = Message.new(message_params)
...
end
end

The final assumption is that the routes.rb file saved in MyAppName/config contains the following code:

get ‘messages/new' => ‘messages#new'
post ‘messages’ => ‘messages#create’

These assumptions are important because they clarify that pressing “Submit” on the form in the above example sends an HTTP POST request to the Messages table in the database. (Actually, the Rails form_for helper generates an html form that submits HTTP POST requests by default, but we needed to specify which database table the form will modify.) An HTTP POST request is mapped to the Rails create action. To learn more about how HTTP verbs are mapped to controller actions, click here.

Back to the Theory

Let’s take another look at the filled-out form example that we started with now that I’ve clarified that pressing “Submit” triggers the Messages controller’s create action. By default, the create action tells Rails to search for an html view to render. Ajax changes this default behavior so that the create action tells Rails to search for a JavaScript partial view (which will then interact with the already-rendered _form.html.erb partial view.)

Then, the code inside the JavaScript partial view should contain instructions for both resetting the two form input fields and displaying help text below the form, as shown in this picture:

form help text_3

This means that after building Ajax into a form, we need to do two more things:

  1. Call a JavaScript partial view from the Messages controller’s create action, and
  2. Build the actual JavaScript partial view

Enough Theory – Tell Me How to build AJAX into my Form!

Step 1: Add ‘remote: true’ to the Rails Form Helper
Building an Ajax form is straightforward with the Rails form_for helper. Simply add remote: true.

<%= form_for @message, remote: true do |f| %>
...
<%= f.submit "Submit" %>
<% end %>

Step 2: Add respond_to to the Controller
Now that Rails will search for a JavaScript partial view as part of the create action, we need to tell the Rails controller where to find this JavaScript partial view. Do this by adding a respond_to do |format| block into the messages_controller.rb file saved in MyAppName/app/controllers.

The general structure of the respond_to do |format| block is as follows:

class MessagesController < ApplicationController
def create
@message = Message.new(message_params)
respond to do |format|
format.js
end
end
end

Step 3: Create the create.js.erb View
Finally, open a blank text file and write all of the jQuery, JavaScript, and Ruby code that displays error and success messages, and that also resets the form. Name the file create.js.erb and save it to the MyAppName/app/views/messages folder.

Note: The file’s name is create because it needs to have the same name as the Rails action that calls the JavaScript partial view.

Wrap Up

A pattern I ran into while searching online for how to submit a Rails form with Ajax was that each example I found walked through a scenario that was slightly different from what I was trying to achieve. Since I didn’t understand the theory behind Ajax forms in Rails, I wasn’t able to modify the examples I found to suit my needs. Thus, I didn’t go into too many specifics in this post because my goal was to give a high-level overview of how to implement Ajax in a Rails form.

If you are interested in specifics, check out my post series that covers all of the steps needed to build a “real-world” database-backed contact form in a Ruby on Rails application.


Did you find this walkthrough helpful?

Do you have questions on the above?

Do you see any errors?


If so, please leave your thoughts in the comments below.

Use the Command Line to view the Contents of a Ruby on Rails Database

Motivation

Database functionality exists within a Ruby on Rails web app from the moment $rails new MyAppName is executed from the command line. In fact, the purpose of creating a Rails app is to have a database backing the application. If you have a database, you occasionally want to see what’s inside. Right?

At least that’s how I felt, and I was frustrated that the Rails tutorials sites I used addressed viewing the contents of a database by creating a view to loop through, and display, each item in the database. Sure this works but what if I don’t want to build a view solely for the purpose of seeing what’s inside my database?

There is an easier way to view the contents of a Rails database – and it can be done using only the command line interface!

Before I begin, make sure to shut down your Rails server if you happen to be running one by hitting Control + C in the computer terminal and returning to the command line.

Walkthrough

$rails dbconsole ($rails db is the shorthand)

Per the Ruby on Rails documentation, this command “figures out which database you’re using and drops you into whichever command line interface you would use with it”. In my case, I am using SQLite3.

sqlite>.help

This command shows all of the possible commands you can execute. The one I need is .tables because it lists the names of all the tables in the database.

sqlite>.tables

SQLite gives me a choice between schema_migrations and the name of the database table I’d like to see, which in my case is called messages.

sqlite>SELECT * FROM messages;

Notice the ; at the end? It’s important. Without it, this command to display all of the entries in the messages table won’t work.

Assuming that the goal of viewing the contents of a database has now been reached, it’s time to:

sqlite>.exit

Note: If you’ve done something wrong and sqlite>.exit won’t help you, hit Control+Z to start over.


Did you find this walkthrough helpful?

Do you have questions on the above?

Do you see any errors?


If so, please leave your thoughts in the comments below.